
last month i woke up all gung-ho to blog and went through my photos, like over a thousand of them, and could not figure out where to start. so today, i decided to just start with the last 24 hours and work in the other 5 months a bit at a time.....or not at all. i am happy to be back....little squeeeees!
standing outside yesterday, as the sun hit my face, the birds were chirping and singing, and i was surrounded by trees and plants...and even weeds, that had all come back to life and were green again, made me happy, and if all of these living bits of nature could survive their wintery hell, then it renewed my hope that our family will survive, thrive and someday, hopefully soon, be in our 'spring'.
there is a meme/e-card thingy that says you either see a weed, or a wish. i have always seen a wish.....
so yesterday, i walked through a field of newly born wishes and collected them.....


today, i collected more.......

....and i put them here....in one of these very old, uber huge, ball jars. i was a lucky girl and came across a few of these many years ago at a garage sale for a couple of bucks a piece. i had to pick my jaw up off the floor when i found out how much these sold for at antique malls. don't let that dandelion fool you in to thinking the jar is small.....we just grow some huge dandelions, and my youngest just mowed 2 days ago.....
i plan on making a tag to tie around the neck of the jar...free wishes, take one as needed. maybe? not sure yet.

i have been playing with all things rusty for the last couple of months....i have tons of rusted fabric photos to play show and tell with, but i can't find the photos at the moment, but as soon as i do i will share.
yesterday i was sorting through my recently rusted stash of fabric to begin stitching in the style of Jude Hill and Junko Oki.... i love, love, love their style...anyway the piece i wanted to use was only rusted, i had not tea dyed it, and i thought it looked too orangey in some areas...where the rust had not left an imprint, but had dyed the fabric. so i put the rusted fabric in a tea dye bath for about an hour, and because it was a good hunk of fabric....i had to wad it up when i put it in the container that held the ferrous sulfate solution. i think, because this is the first time this has happened, it happened because i had to wad the fabric up tightly that i ended up with this!!!!!.....big squeeeees.....


i ended up with a marble-y effect! i am trying to duplicate what i did yesterday, but there are different types of fabric i am using, so we will see what happens. fingers crossed.
i need to back up. i have found out a ton of stuff, purely by accident over these last couple of months. i feel like a mad scientist......but in that crazy artist kinda of way. so it is all good. if you tea dye a piece of fabric, preferably 100% cotton, then you rinse it a bit and put it in a ferrous sulfate solution....my fellow anemics will know what this is.....iron pills diluted in water. i used about 8 pills of the cheapy cheap stuff. you will end up with varying shades of greys and blacks. the fabric looks very aged...and i love the colors. the color is permanent.
if you tea dye a piece of fabric, and then put it in contact with a rusty object you will end up with iron tannate. this will also give you a black or grey tint to your fabric, but i found that it was not always permanent. i think it has to do with whether or not you wash and dry the fabric in between the two steps. it will also keep your rusty things from being able to rust for days, or weeks. this did not make me squeeeee at all.
i have been very impatiently waiting all day to run outside to check the other pieces of fabric to see if i got the same marble-y effect. i do not know if the sun light plays a part in any of this....but i did let the fabric sit in the sun all day yesterday. again, fingers crossed.
i also stitched up this scarf last week, i think it was last week. there was a lot of work in making this. and i love it, and i can not wait until i can do bigger pieces or more stitching on a piece.......i did not want to booger this one up with too much.

these two photos, above and below, are the most accurate as far as color.
this piece of fabric was accordion folded and stitched, shibori style. next it was put in a tea dye bath overnight. the next day it sat outside all day until it dried. to color rose to the top of the fabric, which gives the design or pattern. next i washed the fabric and then removed the stitching, and dipped the ends of the fabric in a ferrous sulfate solution . washed and dried again. then i hand stitched.
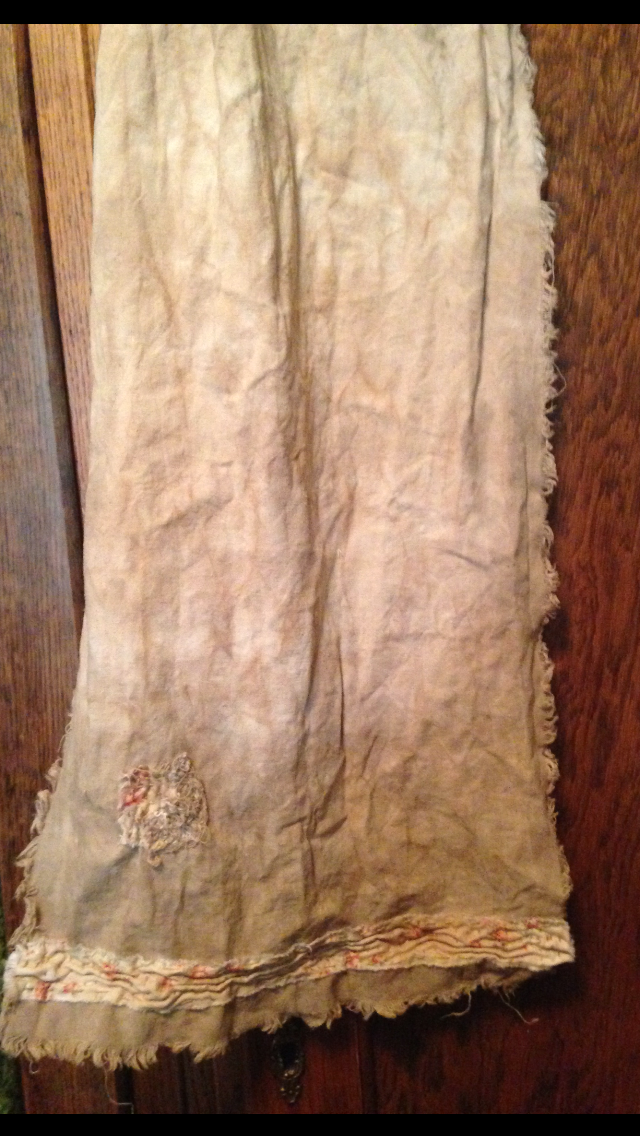
then next few pics have a yellowy tint to them, but that is the result of crummy lighting. the lines you see are where the dye came to the top of the folded fabric and was darker.


you know those tangled bits of the threads you end up with when an edge is not finished and is all ravley? i have been saving them. i just knew i would use them. you know how when the ends of your jeans get all tattered and you have this wadded mess of threads....i knew i could give a new piece of fabric an aged look by stitching the chunks in an artful way. the next day on pinterest i found someone had beat me to it!
i placed a piece of patterned fabric underneath the chunky wad of threads and pulled them and moved them until i liked how it all looked and then began to hand stitch. the intention is to make the section of fabric look frayed and worn.

i did the same thing here on the other side of the scarf as well.


on this side of the scarf i added a long strip of the rosey fabric. i love how it becomes wavey and squished and wrinkly as you stitch. the stitching is suppose to show, it is part of the style.


now, the weather decides to go from winter to summer, so i guess i will have to wait a few months to get to use it. i love the aged-worn-torn-mended-loved look it has. it must be an acquired taste....when i posted a photo to facebook, all i heard were crickets chirping. it did better on instagram. i moped for a minute or so at the end of the day....amazing how feeling rejected at 49 can make you feel like that picked last for the team 5 year old all over again!
yesterday i threw several different types of fabric in what was left of some pink dye. love how different bits turn out different shades.

got the fabric all washed and dried. love the rainbow of pinks i now have. i fell in love with a pink draw string bag stitched by Junko Oki.....that is what fueled this need to dye!
while on pinterest i came across a weird fabric stitch. i started to open yet another tab....something i do for stuff to do now...but later now, not now now. right now....i have about 50 tabs open...49 if you don't count the one i am using to write on my blog. so, we will say only 49! anyway...i decided that instead of adding another tab for something quick and easy i would just doodle it and be done.
i have a ton of zentangles to play show-n- tell with, and i have taught myself to draw! big squeeeeees!
i am trying to figure out a way to make links from my blog for the different types of art i have been making. the hubby has been driving me crazy to put my art dolls on. i want to share my zentangles. if it weren't for others sharing, i would have never learned....or ended up in the oodles of doodles zentangle book! we all learn from and get inspiration from each other.
so, nothing fancy, but i like the look.

i think that is about all for today. i have a ton of stuff i want to get done for mother's day....and i have a new exciting project that i am beginning to work on that i will explain in my next post.
see you soon.....nighty night.


